Aquarium Equipment Guide: Filtration, Heating & Aeration
Introduction: Your Tank's Mechanical Heart
Equipment is the foundation. I don't say that to convince you it matters—I say it because I've watched people skip this step and regret it.
You can plan the perfect aquascape, research the right fish, dial in your maintenance routine. But if your filter's undersized or your heater fails during a temperature swing, none of that complexity matters. The fish suffer. The tank crashes. You get discouraged.
This aquarium equipment guide covers the systems that actually run your tank: filtration, heating, and aeration. Not the pretty stuff. The mechanical work that keeps water stable, bioload under control, and temperatures consistent. You'll leave knowing what to buy and why.
If you worked through Part 1—sizing your tank—you already know your tank's dimensions and volume. Good. We're building on that.
Why Filtration Matters More Than You Think
Beginners often think filtration is about clarity. It's not. A filter that only clears water is doing about 30% of its job.
Real filtration does three things:
Mechanical filtration traps solid particles—uneaten food, fish waste, debris. Think of a physical strainer. Media like filter floss or sponge pads do this work. You rinse them regularly.
Biological filtration is where things get interesting. Beneficial bacteria colonize your filter media, and those bacteria convert toxic ammonia into nitrite, then nitrite into nitrate. This is the nitrogen cycle at work. Without it, ammonia builds up and poisons your fish. You don't see it happen. The filter just quietly handles it.
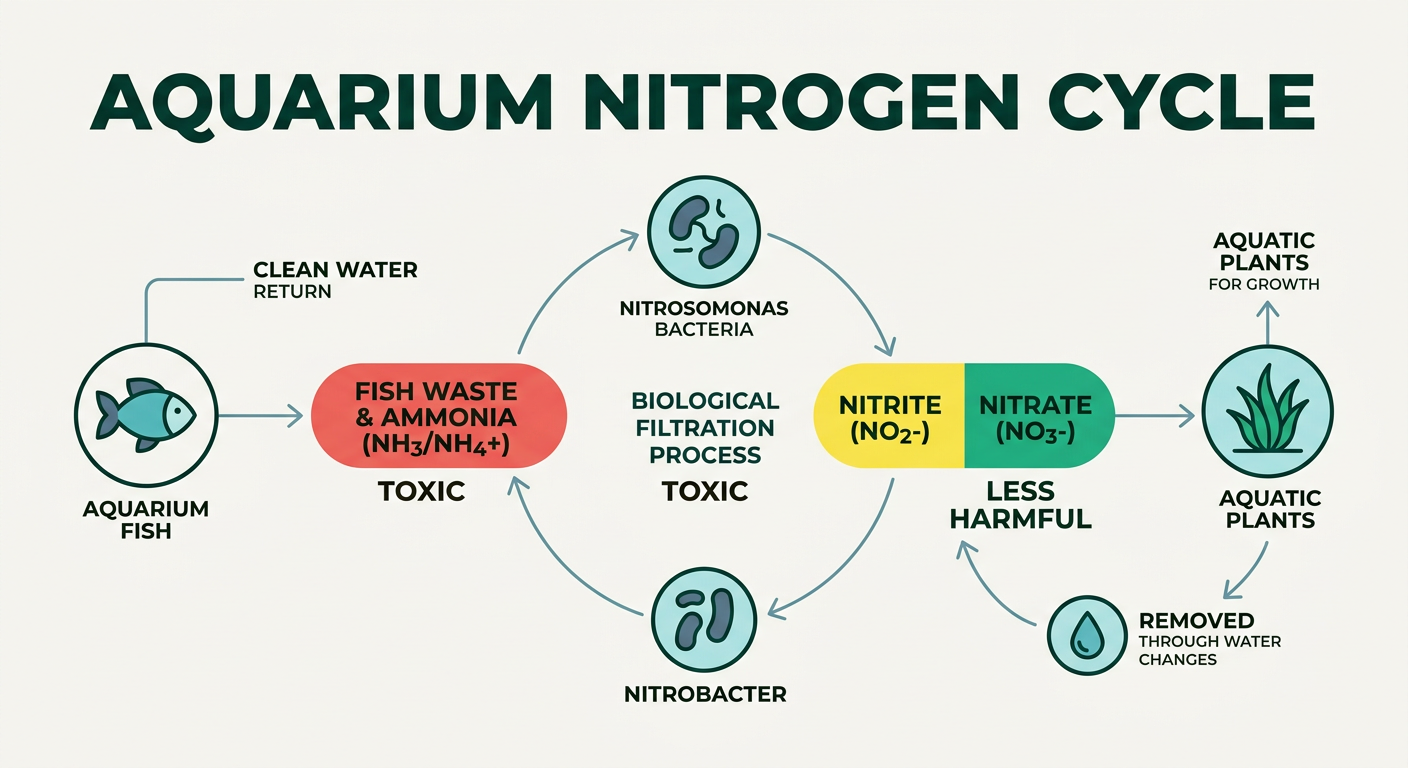 Chemical filtration uses materials like activated carbon to absorb dissolved organics, odors, and discoloration. It's optional for most tanks, useful if you're dealing with medications or stubborn water tint.
The thing people miss: bioload is what drives your filter choice.
Bioload is the total waste your fish produce. A tank with five tetras has low bioload. A tank with three goldfish has very high bioload. Your filter needs to handle whatever bioload you're planning to keep. Get this wrong, and you'll have constant parameter spikes and stressed fish.
This connects to something I'll cover later: the nitrogen cycle. For now, just know that your filter is the engine that keeps that cycle running.
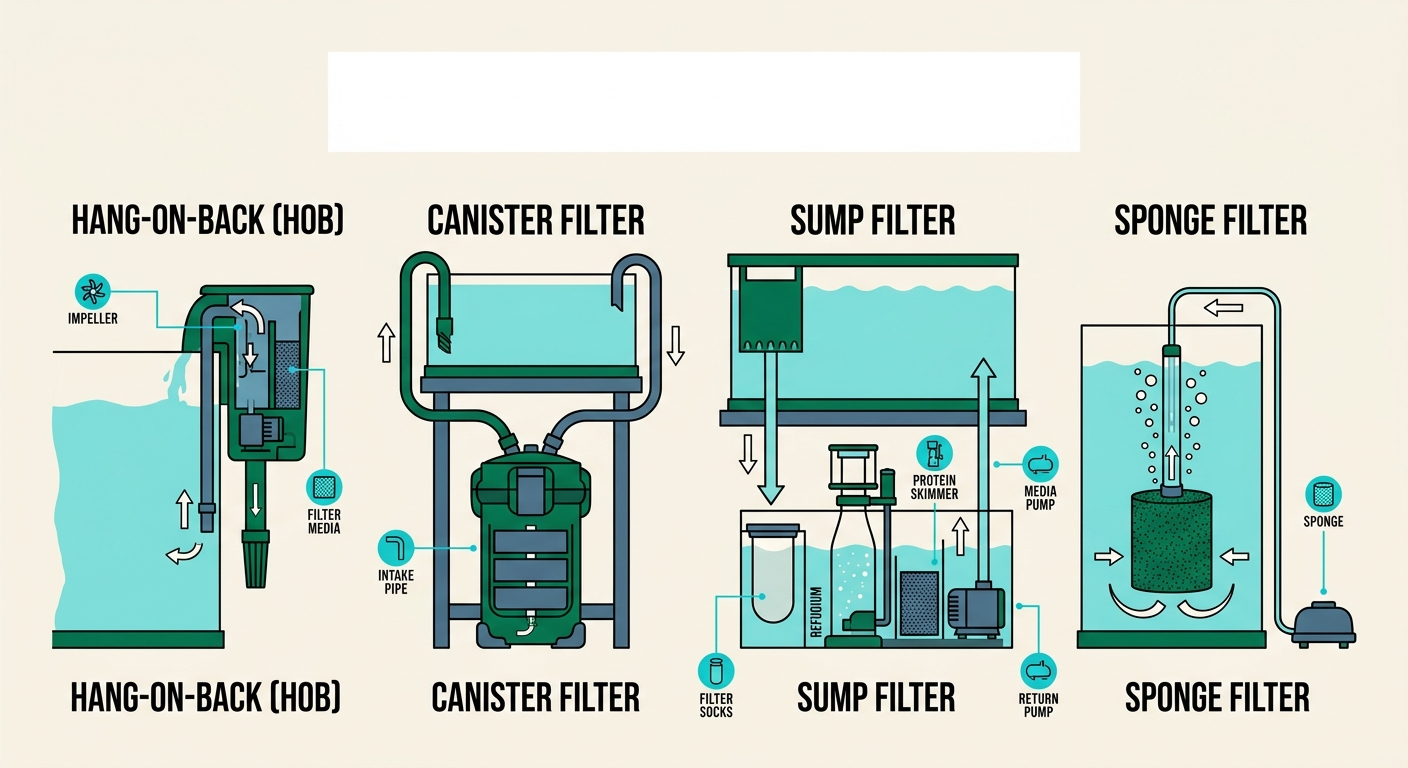
The Four Main Filter Types
Hang-On-Back (HOB) Filters
The most common filter you'll see. Water gets drawn through a tube into a box hanging on the back of your tank, pulled through some media, and poured back in. Simple. Reliable. Affordable.
Easy to maintain—most of the filter sits outside the tank. Easy to adjust. No tools required. They work well for small to medium tanks with moderate or light bioload.
Where they fall short: limited media volume, and the output tends to create a lot of surface agitation right at one spot. That's good for gas exchange, but it means surface film doesn't get trapped and broken down before it gets sucked into the intake. If your tank is heavily stocked, they'll fall behind.
Best for beginners, tanks under 55 gallons, community tanks. If you're new and not sure what you're doing, start here.
Canister Filters
Sealed external canisters filled with customizable filter media. Water gets pumped through an intake tube, passes through multiple media layers inside the canister, and returns through an outlet. They sit under your tank or in a cabinet somewhere.
They handle a lot more water volume than HOB filters. You can stack media types inside and really customize your filtration. They run quietly and don't clutter the tank rim. Great for plants or heavy bioload.
The tradeoff is complexity. They cost more. Setup means connecting intake and output tubes, priming the system, keeping seals intact. If something fails, you've got water on your floor. They take up cabinet space. Maintenance involves opening the canister and risking spills.
If you have 55 gallons or more, a planted tank especially, or heavy bioload, a canister handles it. A good entry-level one gives you way more headroom than an HOB.
Sump Filters
A sump is a separate tank positioned below your main aquarium. Water overflows from the main tank into the sump, passes through various filtration chambers, then gets pumped back up. It's the professional approach—aquarium stores, breeding facilities, and serious hobbyists use them.
The advantage is scale. You get massive filtration capacity and everything you're trying to hide—powerheads, heaters, media baskets—disappears into the sump. You can add or remove filtration components as needed.
This is serious business, though. They're expensive. You need either a tank with holes drilled in it (irreversible) or a hang-on overflow system. Plumbing gets complicated. If your pump fails, circulation stops. If the siphon breaks, you could have overflow issues. A sump demands real planning.
They work for saltwater setups, large freshwater tanks, breeders, and aquarists who know what they're doing. Not a beginner choice.
Sponge Filters
A sponge filter is literally a piece of porous plastic sponge, usually powered by an air pump. Air bubbles up through the sponge, creating flow and suction. Water gets pulled through. No electricity required beyond the air pump.
They're cheap. They work. They create gentle flow, which matters for tanks with fry or small, delicate fish. If the air pump runs, the filter works—no mechanical parts to wear out. Bacteria colonize the sponge heavily.
The downsides are real: they don't trap large particles well, they're not pretty, they take up visible space in the tank, and they can't handle heavy bioload. They're a supplementary filter or a specialized tool.
I keep them running in breeder tanks specifically because they're safe for newborns—intake flow is too gentle to cause problems. I've tested what happens when fry get sucked into different filter intakes, and it's not worth the risk. Sponge filters solve that.
Quick Comparison: Filter Types at a Glance
| Filter Type Cost Capacity Maintenance Best For | ||||
| HOB | $25–60 | Low–moderate | Easy | Small tanks, beginners |
| Canister | $80–250 | High | Moderate | Medium–large tanks, planted |
| Sump | $150–500+ | Very high | Complex | Large tanks, advanced |
| Sponge | $10–25 | Low | Simple | Breeding, QT, backup |
 To pick: start with tank size and bioload. Under 30 gallons with community fish or small species? HOB. At 40–55 gallons, you're in the borderland—a good HOB works, but an entry-level canister gives you more headroom. At 75+ gallons, especially with heavy stock, get a canister. Running a planted tank of any size? Canister keeps the aquascape clean. Breeding something? Keep a sponge handy.
Sizing Your Aquarium Filter: The Math Nobody Tells You
Turnover Rate
People focus on the filter's claimed flow rate and ignore turnover.
Turnover is how many times your filter cycles through your entire tank volume in one hour. You calculate it by dividing the filter's rated GPH by your tank volume. A 40-gallon tank with a filter rated for 160 GPH turns over 4 times per hour.
Most tanks need 4–10 times per hour. Light bioload? Four times is fine. Moderate? Aim for six. Heavy bioload—cichlids, goldfish, large predators? Push toward 10.
The formula: GPH needed = Tank volume (gallons) x Desired turnover (4–10)
A 40-gallon with moderate stock: 40 x 6 = 240 GPH. You'd want a filter rated for roughly 240 GPH or slightly higher.
Why the buffer matters: a filter's "150 GPH" rating is what it can push in a vacuum, not what actually flows through your tank. Media clogs it down. Intake tubes have friction. Real-world flow runs 60–80% of the claimed rating. So pick a filter rated 15–20% higher than your calculated need.
If math is annoying, just remember this: don't cheap out on filter size. Undersized filtration causes constant problems. Oversized filtration is cheap insurance.
Factoring in Bioload
Not all fish produce the same waste.
Goldfish are notoriously messy. They eat a lot, poop a lot, stir up everything. Cichlids are similar—heavy eaters, heavy producers. A 40-gallon tank full of goldfish needs different filtration than a 40-gallon planted tank with small tetras.
If you're stocking heavily with big fish, bump your turnover target from 6x to 8–10x. If you're keeping small, delicate fish like shrimp, you might keep it at 4–5x. The bioload is fundamentally different.
Concrete numbers: a 20-gallon with three fancy goldfish needs 150–200 GPH. The same 20-gallon as a community tank with tetras and corydoras needs 80–120 GPH. Same tank, vastly different filtration needs. Put a community filter on the goldfish tank, and you'll fight algae, ammonia spikes, and sick fish. Put the goldfish filter on the community tank, and you're paying for capacity you don't use.
So before you buy, think about what you're keeping. That bioload drives the filter size.
Heating Your Aquarium
Do You Actually Need a Heater?
Not always. But most aquarists do need one, and I've seen too many people skip this and regret it.
You don't need a heater if your room stays between 72–78°F year-round and you're keeping fish comfortable in that range. Some fish adapt fine to room temperature. Most tropicals—bettas, tetras, cichlids, corydoras—get stressed below 72°F. Coldwater species like many danios and hillstream loaches are fine cooler. Saltwater? Most reef fish need stable heat.
The hidden risk: room temperature isn't stable. It dips at night. It swings with seasons. A tank at 68°F one day and 76°F the next stresses fish constantly. Immune systems weaken. Disease sets in. Metabolism gets confused.
If there's even a chance your room drops below your target, get a heater. It's insurance.
The Watts-Per-Gallon Rule
Work with 2–5 watts per gallon, depending on conditions.
Low end (2 W/gal): your room is already close to your target. You're heating 20 gallons from 72°F to 76°F. A 40-watt heater handles it.
Moderate (3 W/gal): a 5–10°F gap between room and target. Heating a 20-gallon from 65°F to 76°F? A 60-watt heater works.
High end (4–5 W/gal): your room is cold or poorly insulated. Heating a 20-gallon from 55°F to 76°F, or it's a large tank. A 100-watt heater is appropriate.
Some examples:
- 10-gallon, 5°F room temp gap: 10 x 3 = 30 watts
- 20-gallon, 10°F room temp gap: 20 x 3 = 60 watts
- 40-gallon, 10°F room temp gap: 40 x 3 = 120 watts
- 75-gallon, 15°F room temp gap: 75 x 4 = 300 watts
The math is simple, but the application matters. Don't grab the biggest heater you find. Oversized heaters overshoot your target, cool down, heat again. That cycling creates temperature swings that stress fish. Aim for a heater that brings your tank up gradually, not dramatically.
Heater Placement
Placement affects how well a heater actually performs.
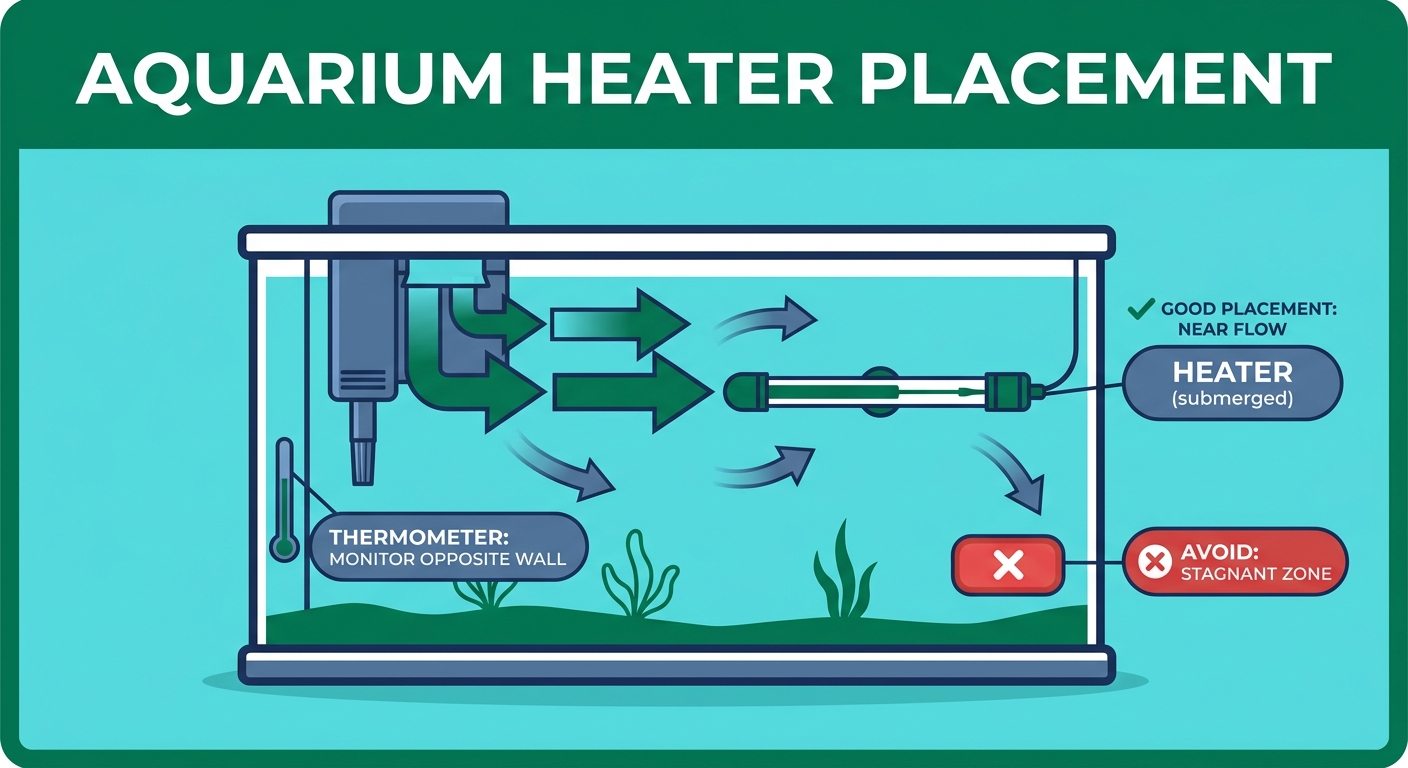 Shove a heater in a corner with low flow and you'll have temperature gradients—warm spots and cool spots. Your fish experience both, which defeats the purpose.
Position the heater near your filter output. Moving, filtered water picks up heat and distributes it. Mount it horizontally when possible for better heat dissipation and sensor contact with the water flow. Don't bury it in substrate or press it against decor. Let water move around it.
Don't aim it at a single plant or piece of wood. Directed heat can damage things. You want diffuse distribution.
One more thing: if you have a HOB filter, the outflow tends to be high in the tank. A heater under that outflow gets good flow but also loses heat to the surface. A heater slightly below center, angled toward the filter output, usually gives better thermal retention.
The Case for Redundant Heaters
Two smaller heaters beat one large one. A 40-gallon tank gets two 75-watt heaters instead of one 150-watt. They cost roughly the same. They run cooler individually, which extends life. And if one fails, the other keeps temperature stable enough to survive the emergency.
This matters most for expensive fish, sensitive species, or breeder tanks. For a hardy community of tetras in a cycled tank, a single heater is fine. For anything valuable or delicate, two heaters are worth the peace of mind.
Setup is straightforward: plug both into the same outlet strip, position them on opposite sides of the tank. They cycle independently—one runs, the other relaxes—and average temperature stays stable.
Aeration and Water Flow: The Invisible Essentials
What Aeration Actually Does
Aeration sounds fancy. It's just air bubbling through your tank. But it does real work.
The primary benefit is surface agitation. When water moves at the surface, oxygen from the air dissolves in, and carbon dioxide leaves. Stagnant water doesn't exchange gases well. Moving water does. Warmer water holds less oxygen naturally, so highly stocked or warm tanks benefit most from aeration.
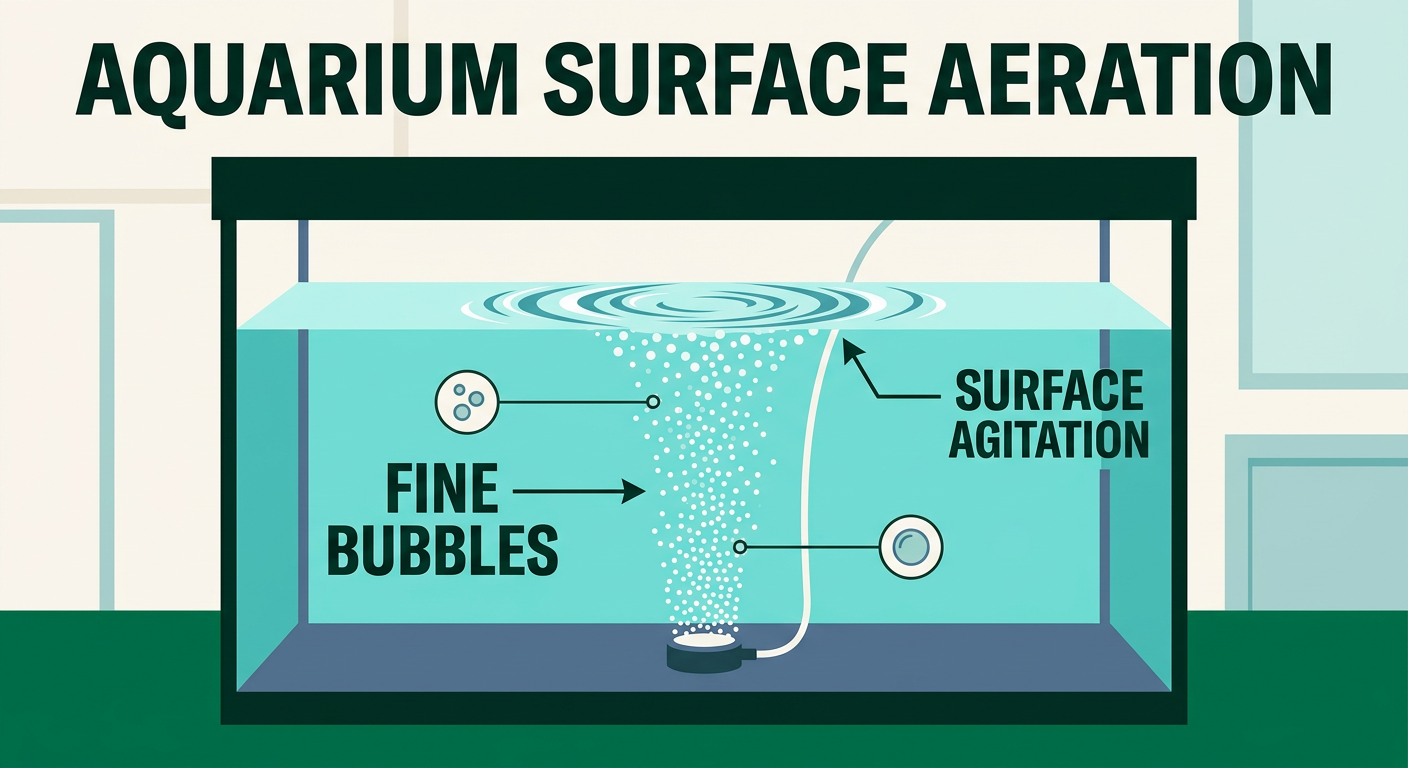 Aeration also prevents surface film—that oily layer that accumulates and blocks gas exchange. An air stone or bubble wand creates turbulence that breaks it up.
When do you need extra aeration beyond your filter?
If your tank runs warm—80°F or above—add it. If you're stocking heavily, add it. If your filter's flow is gentle and surface movement is minimal, add it. If you're treating the tank with medication (some reduce oxygen), add it.
Air pumps move air through tubing to airstones, bubble wands, or diffusers. These break air into fine bubbles. Larger bubbles rise quickly and do less; finer bubbles stay suspended longer. For most tanks, a simple air pump and a ceramic airstone is enough—cheap, effective, reliable.
Water Flow Patterns
Dead spots are places where water barely moves. Debris settles there. Waste accumulates. Bacteria colonies can turn anaerobic.
I map my tank's flow before stocking. I watch where food falls. I trace where bubbles and output flow go. If I see a back corner where nothing moves, that's a problem waiting to happen.
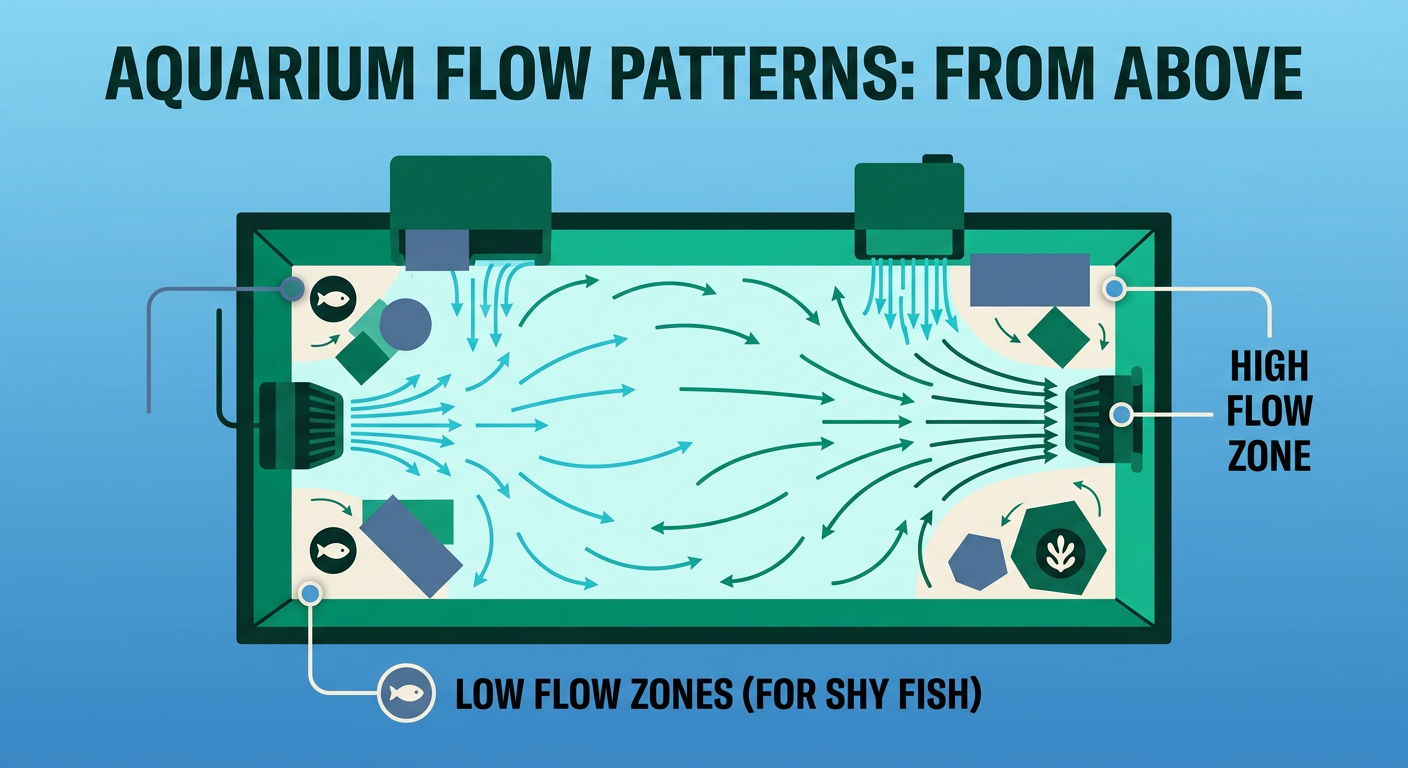 Different fish prefer different flow:
- Low flow: Bettas hate current. Gourami are shy swimmers. Shrimp prefer stillness. Fry need gentle water.
- Moderate flow: Most community fish—tetras, danios, corydoras—like moderate movement. It mimics natural streams.
- High flow: River fish (hillstream loaches, some plecos) come from fast water. African cichlids often come from rocky areas with strong current. They get stressed in still water.
If you're keeping mixed species, aim for moderate flow and use plants or decor to create low-flow zones where the shy fish can rest.
Powerheads and wavemakers create directional flow. A powerhead is a submersible pump that pushes water in one direction—useful for breaking up dead spots or simulating river current. Wavemakers alternate flow patterns, mimicking ocean surge. For most freshwater tanks, they're optional. But if you see flow problems, a powerhead solves them.
Your Equipment Checklist: What to Buy at Every Budget
Setup A: Under $75 (The Bare Minimum)
- Basic HOB filter ($20–40)
- Standard adjustable heater ($20–30)
- Thermometer ($3–8)
- Air pump and airstone, if needed ($10–15)
This works for small tanks (10–20 gallons), light stock, tight budgets. A 15-gallon community setup with HOB filter, 50-watt heater, basic air pump. It handles beginner mistakes. It's affordable.
What you're missing: redundancy, backup, room for error. If the heater fails, temperature crashes. If the filter clogs, you've got an issue.
Setup B: $75–150 (The Sweet Spot)
- Upgraded HOB or entry-level canister filter ($50–100)
- Quality adjustable heater ($25–35)
- Air pump with adjustable valve ($15–20)
- Better thermometer, possibly digital ($20–30)
This covers medium tanks (20–55 gallons), moderate stock, most beginners. A 40-gallon community setup with a solid HOB or small canister, 100-watt heater, aeration, and monitoring tools. It's the setup I recommend to most people starting out—room to learn without constant headaches.
What improves: a better filter handles spikes without crashing. A quality heater maintains temperature more evenly. Aeration makes a visible difference in fish behavior.
Setup C: $150–300 (Reliable)
- Mid-range canister filter ($100–150)
- Two moderate heaters ($50–60 total)
- Powerhead or circulation pump ($30–50)
- Dual-outlet air pump ($25–40)
- Digital thermometer plus a backup analog ($30–40)
For larger tanks (55+ gallons), heavier stock, long-term reliability. A 75-gallon with canister filter, redundant heating, active circulation, and monitoring. This setup mostly runs itself. You do maintenance; the equipment doesn't fail on you.
Redundancy kicks in. Backup heaters mean equipment failure doesn't crash your tank. Better flow control lets you fine-tune the environment. You stop fighting the system.
Setup D: $300+ (The Overkill Option)
- Premium canister or sump system ($150–400+)
- Redundant titanium heaters with external controller ($100–150)
- Multiple powerheads or wavemakers ($80–120)
- Linear piston air pump ($40–80)
- Digital thermometer, pH monitor, optional dosing equipment ($100+)
Large tanks (75+ gallons), sensitive species, breeding projects, peace of mind. A planted 100-gallon with sump filtration, dual heating with digital control, flow optimization, and real-time monitoring. This is what serious hobbyists run, and it works because you invested in resilience.
What you trade: money for confidence. Equipment rarely fails. Water parameters stay stable. You spend time enjoying the tank, not troubleshooting it.
Frequently Asked Questions
What size filter do I need?
Use this formula: GPH needed = tank volume (gallons) x turnover rate (4–10). Community tanks need 4–6 turnovers per hour; heavily stocked tanks need 8–10x. A 40-gallon community tank at 6x turnover needs 240 GPH. Buy 15–20% above your calculated number to account for real-world flow loss through media and tubing.
Do I need a heater?
If your room drops below 72°F at any point during the year and you're keeping tropical fish, yes. Even species that tolerate cooler water need stable temperatures—swings weaken immune systems and cause chronic stress. The only exception is coldwater species in climate-controlled rooms that stay within their preferred range year-round.
How many watts per gallon for an aquarium heater?
Use 2–5 watts per gallon depending on the gap between room temperature and your target. A small gap (within 5°F) calls for 2 W/gal. A moderate gap (5–10°F) needs 3 W/gal. Large gaps over 10°F, or poorly insulated rooms, need 4–5 W/gal.
How much aeration does my tank need?
If your filter creates visible surface movement, aeration is typically sufficient for lightly stocked tanks held at 76–78°F. Add an air stone if water runs above 80°F, stock is heavy, surface movement is minimal, or the tank is under medication that reduces oxygen.
Canister filter or hang-on-back: which should I choose?
HOB filters are simpler, cheaper, and sufficient for tanks under 40 gallons with moderate bioload. Canister filters handle 55+ gallons, offer customizable media, and suit planted tanks well. If you're in the border zone (40–55 gallons), a canister gives you more room to grow into.
Before You Move On
Filter: Size it to your bioload. Use the turnover formula. HOB works for small tanks. Canister for most everything else. Sump is for when you're ready to commit.
Heater: Use the watts-per-gallon rule. Place it near filter flow. Consider redundancy if the tank matters to you. Temperature stability beats precision.
Aeration and flow: Map your tank's movement. Make sure nothing's sitting in a dead zone. Match flow preference to your fish.
Budget: Don't cheap out here. Equipment is cheap. Recovery from failed equipment is expensive—in money, fish, time, and heartbreak.
Next in the series—aquascaping and substrate selection. You'll know what's under the water now. Let's make it look good.
Comments
No comments yet.