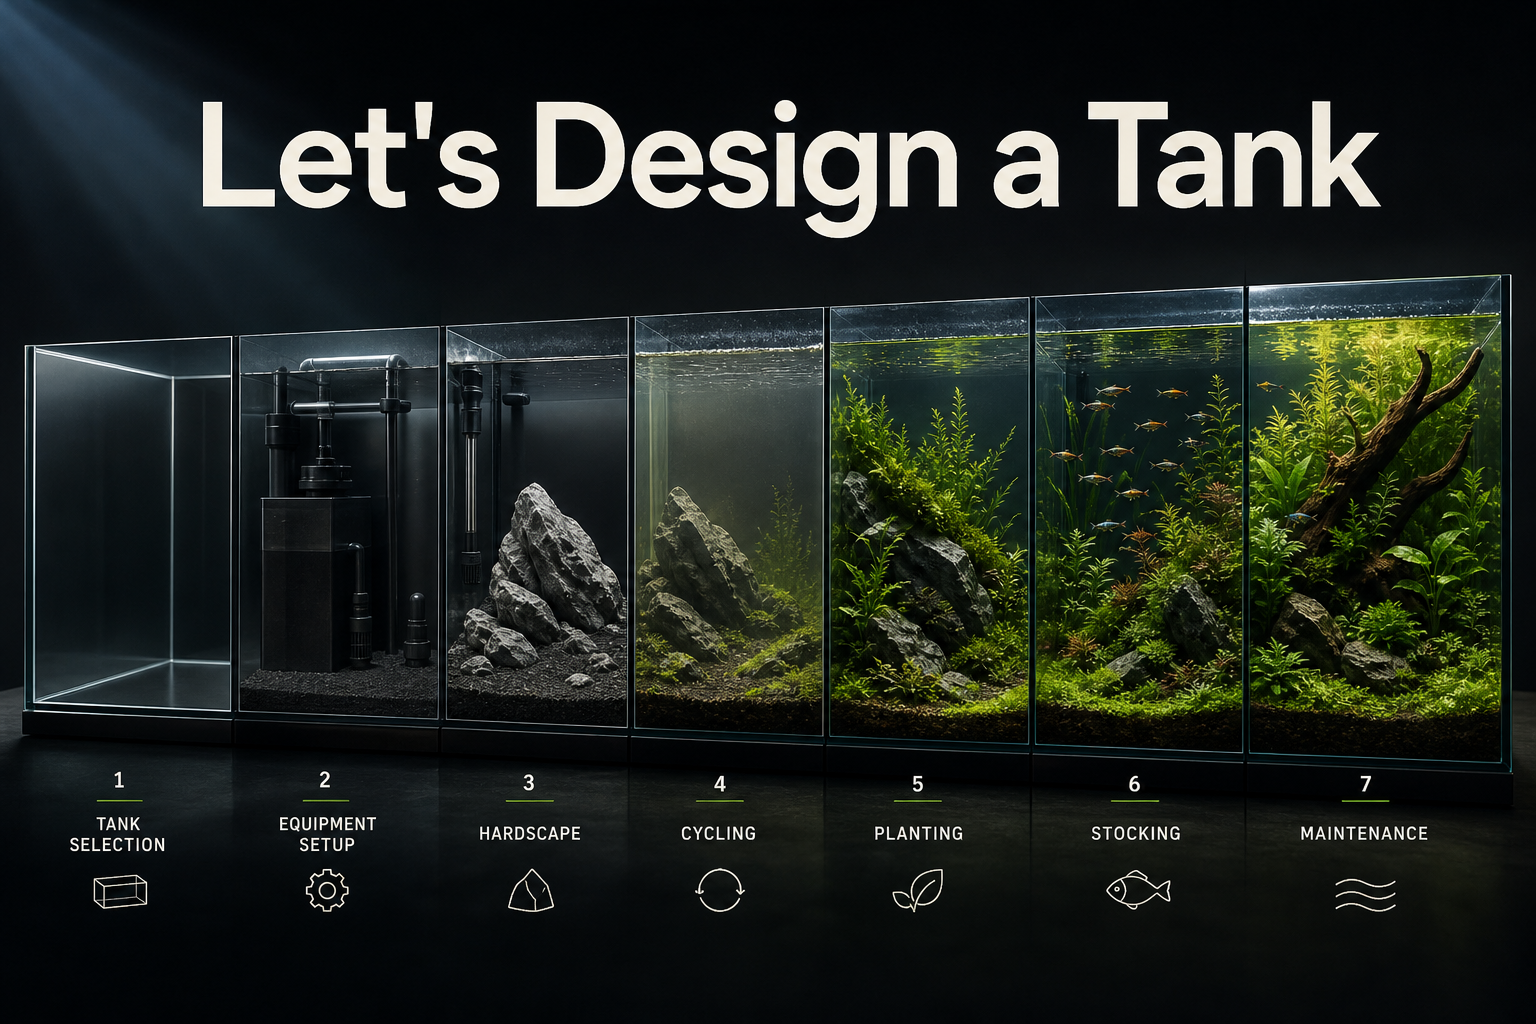
Finding Your Tank's Personality: Aquarium Theme and Design Ideas
Walk through a fish store and you'll see a hundred different tanks. Some are packed with decorations, some are sparse and calm, some look like someone raided a craft supply. Most beginners choose whatever looks pretty in a photo and hope it works. But here's what I've noticed from keeping tanks across so many years: the ones with the strongest sense of cohesion, the ones where fish behave naturally, plants grow well, and the whole system stays stable, aren't random. They're built around a decision made early on. That's your aquarium theme.
This doesn't mean your tank has to look like an Instagram hardscape masterpiece. It means you've decided what this tank is for. Is it a natural river habitat? A planted garden? A low-maintenance display? That one decision cascades through everything that follows: the substrate you choose, the rocks and wood you buy, the plants you keep or skip, even how you light the tank. When you know your direction, every other choice becomes clearer.
This article walks through the building blocks of aquarium design and layout. Substrate comes first because it's the foundation, literally and functionally. Then hardscape: the wood and rock that shape your tank. Then plants, backgrounds, and aquarium decorations that create depth and personality. By the end, you'll have a framework for building a tank that's both beautiful and functional.
Aquarium Substrate Types: Starting From the Ground Up
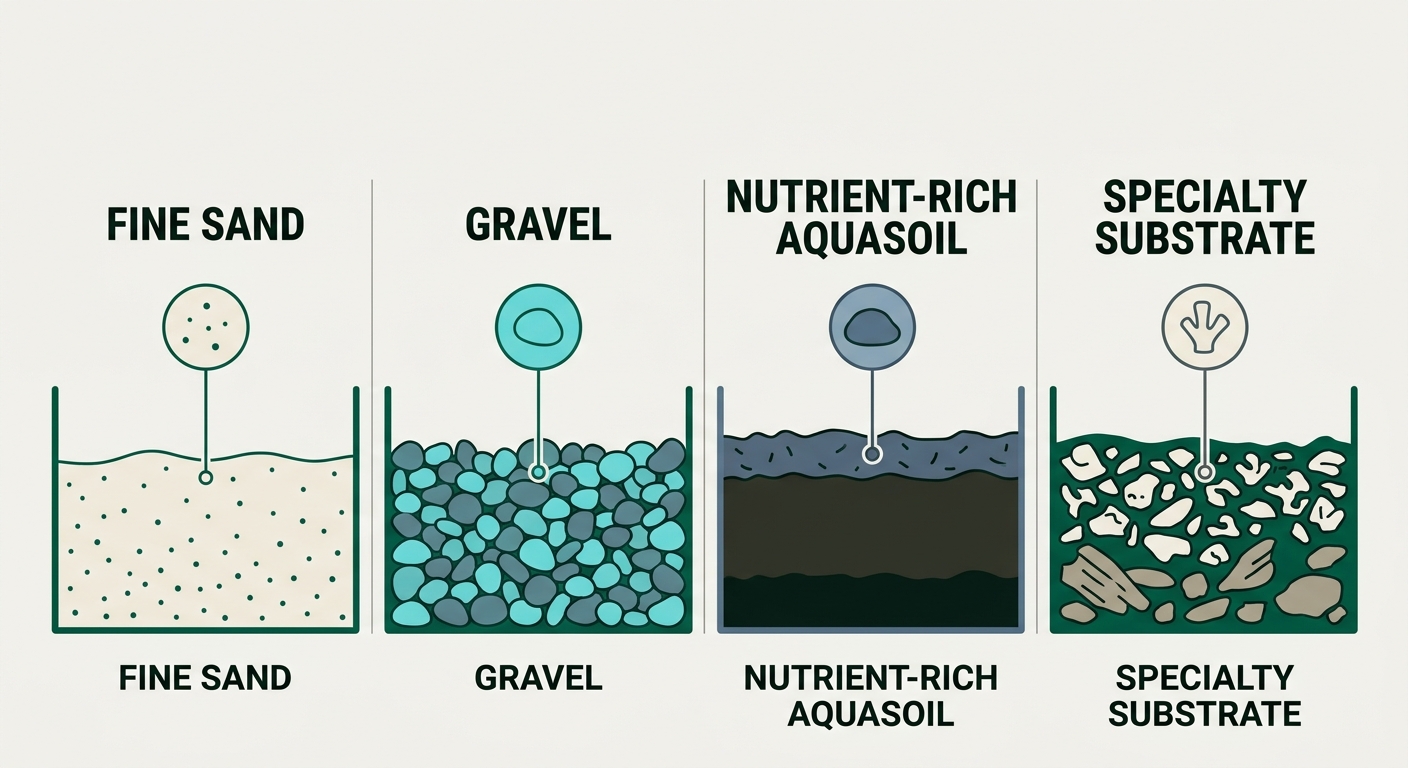
Substrate choice matters more than most beginners realize. Yes, it looks nice. But it also does work. The right substrate supports beneficial bacteria that filter your water. It can shift your water chemistry. It gives plants something to root into or provides shelter for bottom-dwelling fish. It sets the tone for everything else you build on top of it.
 Sand
Sand
Sand looks natural. It's what most wild fish live on. If you keep corydoras catfish or stingrays, you'll notice they sift through substrate constantly. These fish need sand because gravel damages their barbels. Sand also doesn't trap debris between grains the way coarse gravel does.
The tradeoff: sand can compact, especially in planted tanks where you're not stirring it constantly. When it compacts, roots can't push through, and anaerobic (oxygen-free) pockets form at the bottom. You can manage this by poking around occasionally or using root tabs for plants, but it's one more thing to think about. Sand also clouds the water temporarily when you stir it.
I typically use sand in tanks with sand-sifting fish or for biotope setups. Fine sand works well. Silica sand and play sand work, but you need to rinse thoroughly first. I've learned this the hard way. Skip the rinsing and factory dust clouds your tank for weeks.
Gravel
Gravel is the versatile middle ground. It comes in a range of sizes. Standard for planted tanks is 1 to 2 mm. It doesn't compact as easily as sand, so it works well in planted setups and community tanks. Debris can settle between coarser grains, so grain size actually matters. Too large and you get pockets where waste collects. Too small and it starts acting like sand.
I've used gravel in probably 70% of my tanks over the years. It's chemically inert, meaning it won't change your water chemistry unless it's coated with something. It's easy to clean during water changes. It's forgiving for beginner setups. The one real caveat: watch out for sharp substrates. Loaches, plecos, and other bottom fish get scraped if the gravel is too brutal.
Soil and Planted-Tank Substrates
If you're setting up a planted tank, a nutrient-rich base layer underneath an inert cap is standard practice. These substrates, often called aquasoil, are dense and loaded with nutrients. They have high cation-exchange capacity, which means they hold onto nutrients and make them available to plants over time. Popular options include ADA Aquasoil and various knockoffs that work similarly well.
The catch: soil-based substrates can leach ammonia into your water column initially, especially the first few weeks. If you're cycling with fish, this adds stress. I usually run fish-in cycles in tanks with soil, but it requires patience and frequent parameter checks. Some aquarists skip this by doing a fishless cycle first. I honestly prefer that approach. The data is cleaner and the fish don't experience the parameter swings.
Soil also doesn't work for all setups. Sand-sifting fish will destroy it. Soil-based substrates need careful layering to work well long-term.
Specialty Substrates: Peat and Crushed Coral
Peat softens water and releases tannins. That brownish tint in blackwater tanks? That's tannins. If you're keeping discus, tetras, or other soft-water fish, a peat layer can be useful. But it stains your water brown even when you don't want it to. Use it in moderation and only when that aesthetic fits your theme.
Crushed coral and aragonite do the opposite. They raise pH and hardness, making them essential for African cichlids and marine tanks. They're not for soft-water setups.
Practical Tips for Substrate Setup
Depth matters. Aim for at least 5 cm, or about 2 inches, in planted tanks. Less and roots struggle. In community tanks with no plants, shallower works, but then you lose some of that natural appearance. I typically run 2 to 3 inches front to back.
Mixing substrates can work if you layer them intentionally. Soil under sand or gravel creates a nutrient-rich base while keeping the appearance clean. But be aware they'll mix over time. In my experience, this happens faster than most people expect. Usually by month two or three, your top layer and base layer start blending together.
Rinse everything. All inert substrates (sand, gravel, rocks) need thorough rinsing. I fill a bucket, stir, dump the dirty water, and repeat five to eight times. It's tedious, but cloudy water from substrate dust takes weeks to clear otherwise.
Hardscape: The Bones of Your Layout
Hardscape is the framework you build everything else around. It's the driftwood, the rocks, the solid anchor points that define your tank's structure. And it should go in before you add plants, decorations, or fish. Trying to rearrange hardscape in an established planted tank is frustrating. You uproot plants, cloud the water, disrupt fish.
I spend more time on hardscape than most people expect. I'll dry-scape, arranging everything without water, until the layout feels right. It costs nothing in water or time, and catching mistakes before you fill the tank saves real effort later.
Driftwood
Different types of wood bring different aesthetics and require different prep:
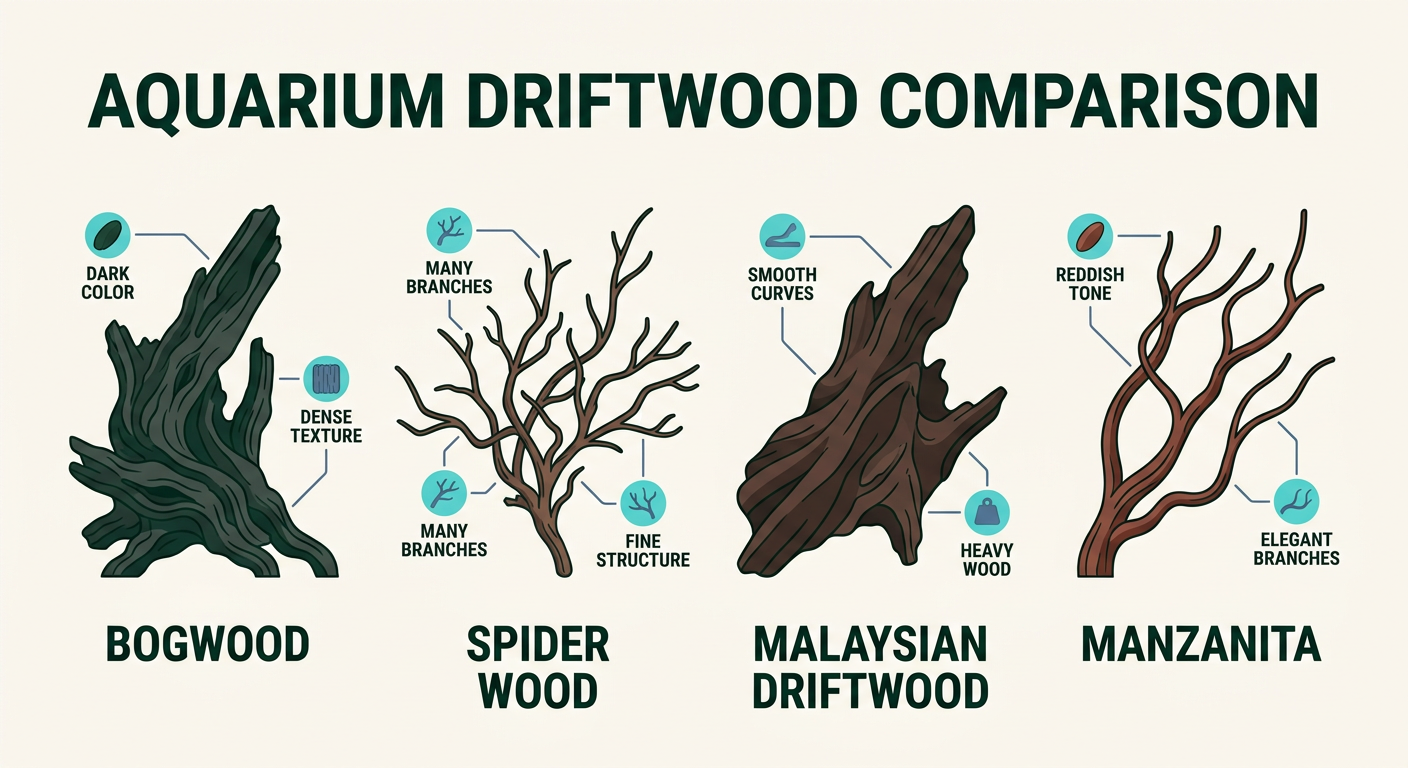 Bogwood (Morta) is ancient wood preserved in peat. It sinks readily and releases tannins, creating that warm, blackwater aesthetic. Boil it to reduce tannins and speed up waterlogging if you don't want the stained-water look. Bogwood is usually dark and gnarled. Excellent for nature aquariums and habitat tanks.
Spider Wood is twiggy and intricate, with lots of small branches. It's popular in aquascaping because it creates visual complexity and provides lots of surface area for moss to grow. Downside: it grows biofilm readily in the first few weeks, which looks grey and fuzzy but is harmless. Soaking it helps, though biofilm will probably still appear.
Malaysian Driftwood is dense and dark, sinks quickly, and has fewer tannins than bogwood. It's versatile. Works in most themes. Boiling sterilizes it and speeds up preparation.
Manzanita is hardwood with smooth curves and a reddish-brown color. It's beautiful but expensive and floats for a long time. You'll need to soak it extensively or weight it down initially. It has minimal tannins, so it won't affect water chemistry.
All driftwood needs preparation. Soaking or boiling removes surface tannins and helps it sink. Fresh wood floats and can leach harmful compounds. I typically soak new wood for a few days, or boil it for 30 minutes if I want it prepped faster.
Rocks and Stone
Lava Rock is porous and light. It provides tons of surface area for beneficial bacteria and moss attachment. It's affordable and works in almost any setup. Downside: it can look a bit industrial.
Slate is flat and stackable, making it perfect for creating ledges and caves. It's also soft enough that you can break it to custom sizes. Natural looks, practical for functionality.
Seiryu Stone is blue-grey with sharp angles. Dramatic and recognizable. It contains limestone, so it raises water hardness. If you're keeping soft-water fish or plants that prefer acidic conditions, it's not ideal. Good for cichlid tanks and harder-water setups.
Dragon Stone is eroded and hole-ridden, with real texture and visual interest. It's less common and more expensive, but it makes a statement piece if you have the budget.
Before using any rock or stone in your tank, check if it affects water chemistry. A simple test: put a sample in distilled water for a week and retest the water. If pH or hardness changed, the stone is reactive. Works fine for some themes, but matters if you're trying to maintain soft, acidic water.
Layout Principles
I've learned a few compositional rules that consistently produce layouts that feel right:
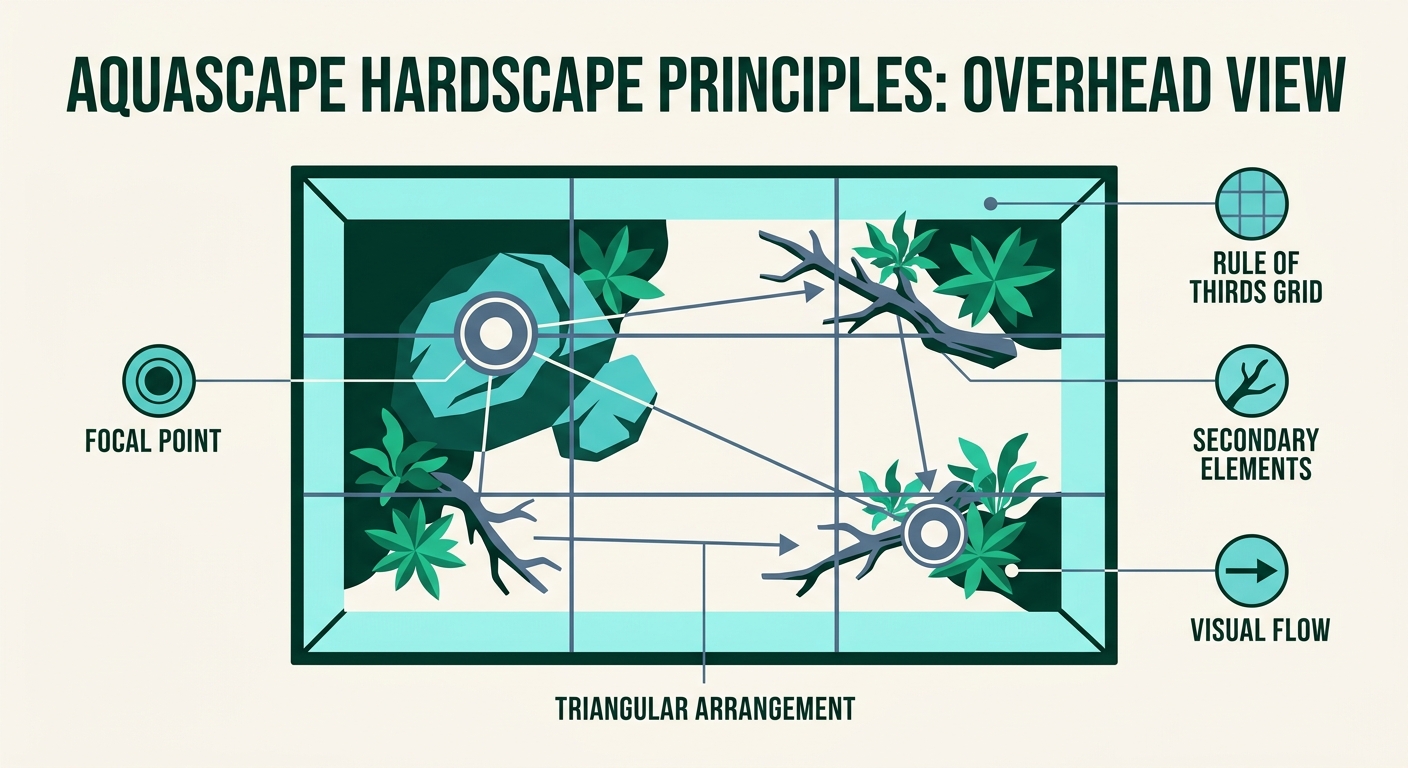 Rule of thirds: Divide your tank into a 3 by 3 grid. Place your focal points, the biggest stone or most striking piece of wood, at the intersections, not in the center. Centered layouts look flat. Off-center arrangements draw the eye and create visual interest.
Golden ratio: This is the 1.618 ratio that appears throughout nature. It sounds mathematical and fussy, but the practical takeaway is simple. Asymmetrical arrangements feel more natural than symmetrical ones. If you place a stone on one side, offset it with a plant group or wood on the other, rather than mirroring it exactly.
Triangular composition: Arrange your hardscape to form an imaginary triangle. One point front-left, one back-center, one mid-right. Or whatever works for your tank. It feels intentional and balanced without looking staged.
One focal point: Pick one dominant element. The largest stone or the most visually striking piece of wood. Make it prominent. Everything else supports it. Tanks with three or four equally important pieces look busy and confused.
The best tool for getting this right: dry-scape before you add water. Arrange everything, step back, live with it for a day or two. Does it feel balanced? Does your eye land where you want it to? Does it look like it has a plan? If not, move things around. This costs nothing and saves frustration.
Live Plants vs. Artificial Plants: The Big Decision
This choice shapes everything downstream. Not just visually. The whole maintenance profile of your tank changes based on this decision.
Live Plants: What You Get
Live plants do work. They produce oxygen through photosynthesis. They absorb excess nutrients: nitrates, phosphates, ammonia. These would otherwise build up in your water. In a well-planted tank, nutrient levels stay lower, algae has less to feed on, and water quality stays more stable. I've kept the same planted tanks running without major issues for years. The ecosystem settles into a balance.
Plants also provide shelter and spawning sites for fish. Shy fish feel less stressed with dense vegetation. Many fish behaviors, especially spawning and fry-rearing, rely on plants. If you're breeding fish or keeping shy species, live plants aren't optional.
The cost is real. Most live plants need adequate lighting. That's a fixture, likely LED, easily 50 to 200 dollars depending on tank size. Nutrient-demanding plants need fertilizer. Some benefit from CO2 supplementation, which adds cost and complexity. And plants can introduce pests: snails, algae, or even tiny crustaceans that came on the plant's leaves.
If a live plant dies or gets infected, it can decay in your water column and cause parameter spikes. It's less common than people fear, but it happens.
Starter Plants That Actually Work
I usually recommend starting with plants that tolerate lower light and don't demand expensive fertilizers:
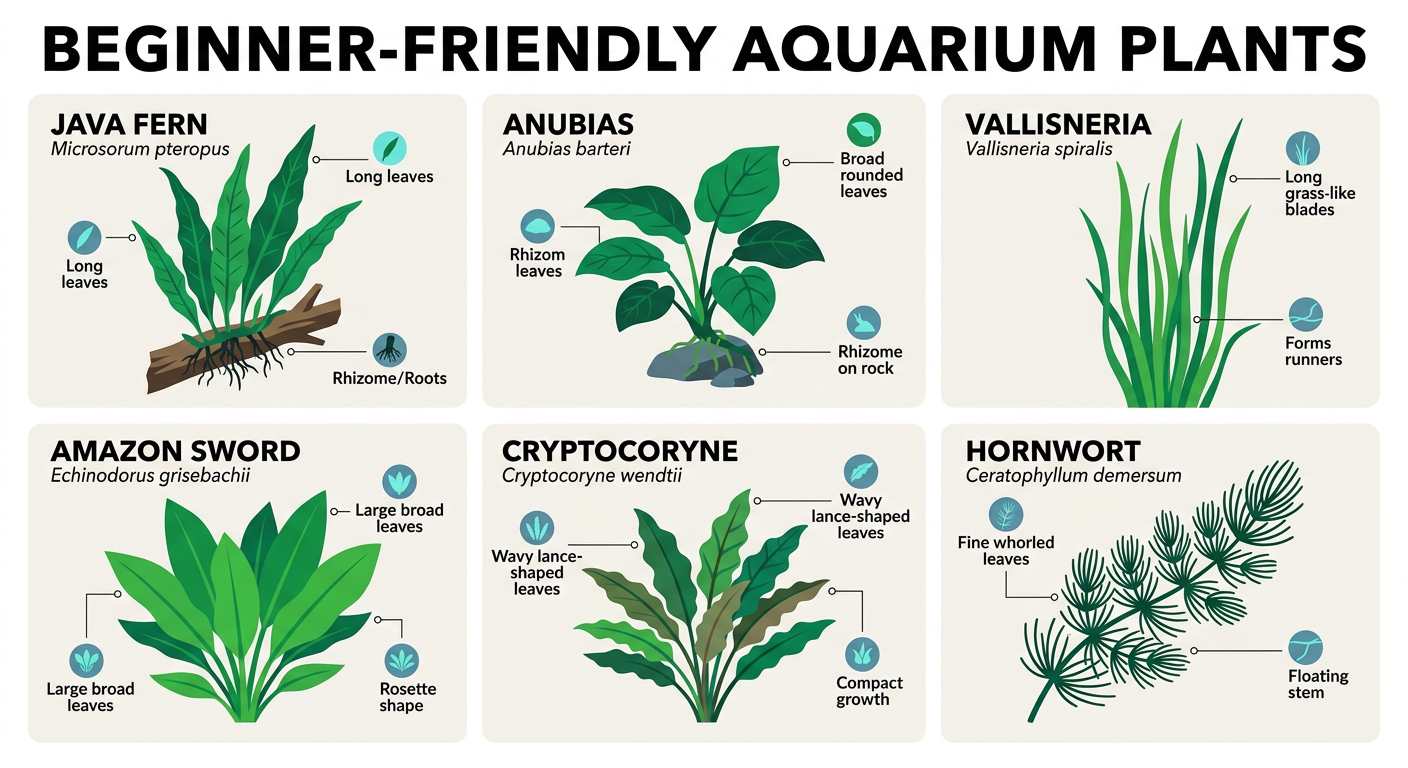 Java Fern attaches to hardscape with rhizoids, root-like structures. It's nearly bulletproof. Low light, no CO2, minimal fertilization. It's slow-growing, which means it doesn't quickly overtake your tank, and it works in almost any water chemistry.
Anubias is similar. Hardy, slow, adaptable. Keeps its shape predictably. When plants look like they're holding their form rather than exploding vegetation, it's easier to manage the aesthetic.
Vallisneria is grass-like and spreads via runners. It grows faster than Java Fern or Anubias, which means it fills space more quickly. Good for background areas.
Amazon Sword is a larger background plant. It needs a bit more light and fertilization, but it's forgiving compared to demanding stem plants. One plant can anchor an entire tank's planting scheme.
Cryptocoryne comes in dozens of varieties. Most adapt to a wide range of light and water conditions. They're slow starters but reliable long-term.
Hornwort is fast-growing and can float or be planted. It gets messy quickly and sheds leaves, so it's not elegant, but it works for bare-bones setups where you just want something green.
Start with two or three of these. Don't try to build a complex planted landscape your first attempt. Most beginner overwhelm comes from planting a dozen species, having half fail, and then giving up on plants entirely.
Artificial Plants: When They Make Sense
Artificial plants don't improve water quality. They don't compete with algae for nutrients. They require no light, no fertilizer, no CO2. You can clean them, rearrange them, leave them alone for weeks without worry. If you're busy, or if your lighting setup limits your options, artificial plants are practical.
The quality varies wildly. Cheap plastic looks cheap. Stiff plants that don't move look plastic. Painted plants can chip. But silk plants, woven fabric with soft leaves, move more naturally and look better. They still don't look like real plants up close, but they're less obviously fake.
Choose aquarium-safe materials. Some cheaper decorations leach dyes or chemicals. If something feels sketchy, don't put it in your tank. The cost of a bad decoration is way less than the cost of fixing an entire tank after something toxic leaches into it.
The Hybrid Approach
Mix them. Put real Java Fern and Anubias in the midground and background for ecosystem benefit, and use artificial plants for quick visual fill in the foreground. Real plants on hardscape, artificial in open areas. You get some of the benefits of each without the commitment of maintaining a fully planted tank.
This is what I do in tanks where I want planted aesthetics but don't have the time for full care. It's honest hybrid design, not settling.
Aquarium Backgrounds and Decorations: Creating Depth
A good background transforms a tank from a bright glass box into something that reads as a window into another world. It hides equipment, creates contrast, and gives your eye somewhere to rest besides staring directly at the back glass.
Background Options
Painted backgrounds are simple and cheap. Apply aquarium-safe paint to the outside back glass. Solid black, muted blue, dark green, whatever fits your theme. Black in particular makes fish colors pop and hides equipment instantly. Disadvantage: it looks flat. There's no depth illusion.
Printed 3D backgrounds are vinyl or acrylic sheets with realistic texture. They create an illusion of depth. A rocky cliff, dense plants, misty forest. If they're well-matched to your tank's style, they work. If they're mismatched, they look like you pasted a poster on your glass.
Foam and polystyrene backgrounds are carved foam panels sealed with aquarium-safe sealant. They're three-dimensional, so they create real depth, not illusion. They often include holes for moss or small plants to grow on. They take work to create or customize, but they look intentional.
Planted back walls are mesh or foam filled with substrate where mosses or small plants root. They're living, they filter water slightly, and they look incredible if they're healthy. They also require maintenance: regular misting if they dry out, monitoring for algae, ensuring water flow reaches them. High effort, high reward.
Creating the Illusion of Depth
Depth is about layering. Your eye should move from front to back through distinct zones:
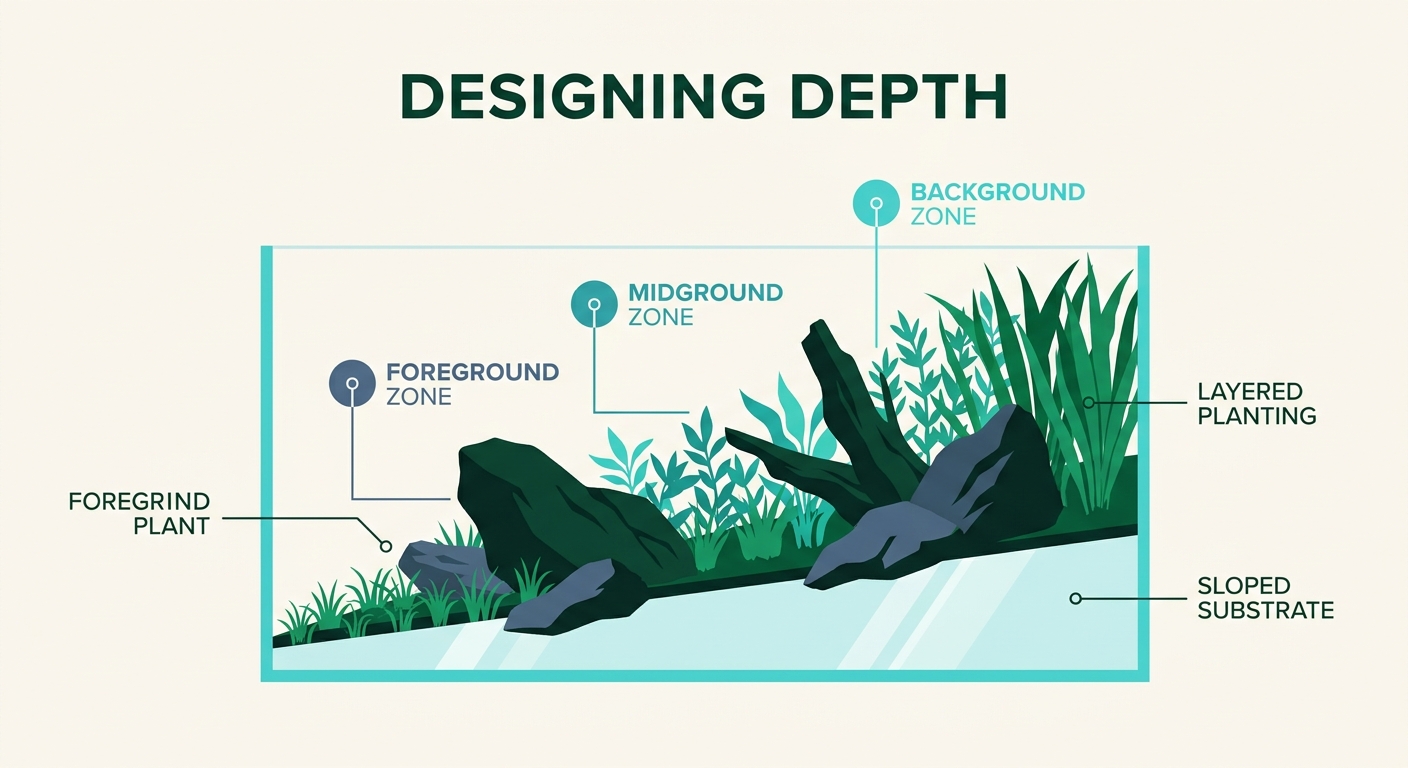 Slope your substrate. Higher at the back, lower at the front. This exaggerates perspective. The front looks closer, the back looks farther. A couple of inches difference is enough.
Layer plants by height. Foreground: short, carpeting plants like dwarf hairgrass or Monte Carlo. Midground: medium-height plants around 4 to 6 inches. Background: tall, bushy plants. Your eye travels vertically, which reads as depth.
Place hardscape strategically. Larger rocks and wood in the foreground, smaller toward the back. This is reverse perspective. The closer something is, the larger it appears, so using size to imply distance creates depth.
Use negative space. Don't fill every inch. Bare sand or gravel in patches actually makes the tank look larger, because your brain reads empty space as "far away." Packed tanks look smaller and more chaotic.
Play with color and texture. Fine-textured plants in the back (ferns and mosses look delicate from a distance) and coarser textures in front. Darker colors in the back recede; brighter colors come forward. These are subtle rules, but they work.
Decorations That Fish Actually Use
This matters more than aesthetics. Caves, tunnels, and hollow structures aren't just pretty. They're functional. Fish use them for shelter, hiding from tankmates, breeding sites, and stress reduction. If you add decorations, make sure they have purpose.
PVC pipes work. Terracotta pots work. Slate stacked into caves works. Natural wood and stone with gaps and crevices work. Plastic castles? Usually not loved by fish, but they're harmless if they don't have sharp edges.
Avoid clutter. A few purposeful decorations beat a tank packed with stuff. Step back and ask: does this decoration support the theme I'm building, or is it just taking up space? Less is almost always more.
Budget-Friendly Theme Ideas to Spark Inspiration
You don't need to spend a lot to build a tank with personality. These themes prove it:
The Blackwater Tank
Mimics the soft-water, tannin-stained habitats of the Amazon and other tropical systems. Minimal gear, maximum impact. You need driftwood (boiled or not, depending on how much stain you want), some soft-water plants or none at all, low lighting, and sand or fine gravel.
Instead of buying fancy tannin supplements, collect fallen leaves. Oak leaves, Indian almond leaves. Get them from a pesticide-free area, boil them thoroughly, and add them. Free. Your water will turn tea-brown over a few weeks as the tannins leach out. Fish adapted to soft water, tetras, dwarf cichlids, bettas, thrive in blackwater systems.
Cost savers: sponge filter instead of a hang-on filter. That's 10 to 20 dollars versus 40 to 80 dollars. Basic heater and thermometer. Low lighting. You don't need LED. The dark water requires less light anyway. Total setup cost for a 20-gallon tank: 100 to 150 dollars.
The Minimalist Nature Aquarium
Pick one striking piece of driftwood or 2 to 3 rocks. Plant a carpeting moss or small plant like dwarf hairgrass. Leave open sand or gravel. Stock a small school of tiny fish. Ember tetras, chili rasboras. That's it. The empty space is the aesthetic.
Size helps here. Start with 5 to 10 gallons. Smaller tanks cost less to set up and less to maintain. Use cuttings to start plants instead of buying mature specimens. Trade with local hobbyists for plants instead of buying. DIY CO2 (yeast method) works if you need it. That's 5 dollars in supplies.
Cost: 80 to 150 dollars for the complete setup, depending on driftwood choices.
The Biotope-Inspired Build
Pick a specific habitat. A Southeast Asian stream, an African rift lake, an Amazon blackwater pool. Replicate it. Research the water parameters, the plants and fish native to it, the substrate and rocks. Use those species and nothing else.
Collect rocks and sand locally if possible. Always test for safety and chemistry shift first. Buy hardy plants native to that region or safe equivalents. Pick one or two fish species instead of mixing everything. This focus drops costs because you're not buying a dozen different fish.
Cost: 120 to 200 dollars for a 20-gallon setup, depending on local material availability.
The Creative Repurpose Theme
DIY foam background sealed with aquarium-safe cement. Unglazed terracotta pots as caves. PVC pipes as tunnels. Cleaned, non-toxic toy figures. Thoroughly tested for leaching first. Second-hand equipment from thrift stores or aquarium groups.
Always test weird materials. Soak something suspicious in distilled water for a week, then retest the water for chemistry shift. If nothing changed, it's probably safe. If parameters shifted, don't put it in your tank.
This approach takes time more than money. Cost-effective and genuinely personalized.
Making Affordable Look Intentional
The difference between a cheap tank and a budget-smart tank is intention. Ask yourself why you chose each element. Does it fit the theme? Does it make sense aesthetically? If your answer is "it was cheap," keep looking. If it's "it fits the blackwater vibe" or "it creates the depth I was going for," then the cost doesn't matter.
Simple layouts read as sophisticated. Complex 2000-dollar tanks can look cluttered. A single piece of striking hardscape, open space, and intentional plant choices beat half a dozen decorations crammed together.
Wrapping Up: Your Next Steps
Theme drives every decision. Substrate supports both the look and the biology. Hardscape comes before fish. Plants complete the ecosystem or decorations fill the space. Your choice. Backgrounds create depth. Depth creates the illusion of a world, not just a box.
Before you buy anything, sketch your idea. Dry-scape if possible. Live with the layout for a day. Does it feel right? Does it match your theme? Does it have a clear focal point? If the answer is yes to all three, you're ready to fill it.
The next article covers stocking. Which fish go together, how many, and why some combinations fail that look good on paper. That's where your design gets tested. For now, focus on building the stage. Get the stage right, and the rest becomes easier.
Comments
No comments yet.