Introduction: From Concept to Execution
You've picked your tank size. You've decided on your fish. You know what style you want. Now comes the aquarium setup plan. This is the part that actually matters: making it happen.
If the first four articles in this series were about dreaming, this one is about planning. And I mean real planning. The kind where you think through costs, timelines, where things go, and the non-negotiable biological reality of how setting up a fish tank actually works.
We'll cover budget, setup day, the cycling process that separates a successful tank from a disaster. Nothing here is complicated, but some of it takes patience. That patience is intentional.
Creating Your Aquarium Budget and Timeline
Let's start with the things people always wonder about: how much this costs and how long it takes.
Cost Breakdown by Tank Size
Equipment costs vary dramatically depending on tank size and whether you're going for functional basics or reliable, long-lasting gear. You actually spend this:
| Tank Size | Budget Setup | Quality Setup | Breakdown (Budget) |
| 10 gallons | $100–$200 | $200–$300 | Tank $20–40 | Filter $15–40 | Heater $15–25 | Lighting $20–60 | Substrate $10–20 | Conditioner $5–10 | Test Kit $20–30 | Misc $5–15 |
| 20 gallons | $150–$300 | $300–$500 | Tank $30–60 | Filter $25–80 | Heater $20–35 | Lighting $30–100 | Substrate $15–30 | Conditioner $5–10 | Test Kit $20–40 | Misc $10–20 |
| 40 gallons | $250–$500 | $500–$800 | Tank $60–120 | Filter $40–150 | Heater $30–50 | Lighting $50–200 | Substrate $20–50 | Conditioner $5–15 | Test Kit $25–50 | Misc $20–40 |
| 75+ gallons | $400–$800 | $800–$1500+ | Tank $120–250 | Filter $80–300 | Heater $50–100 | Lighting $100–400 | Substrate $40–100 | Conditioner $10–20 | Test Kit $30–60 | Misc $30–80 |
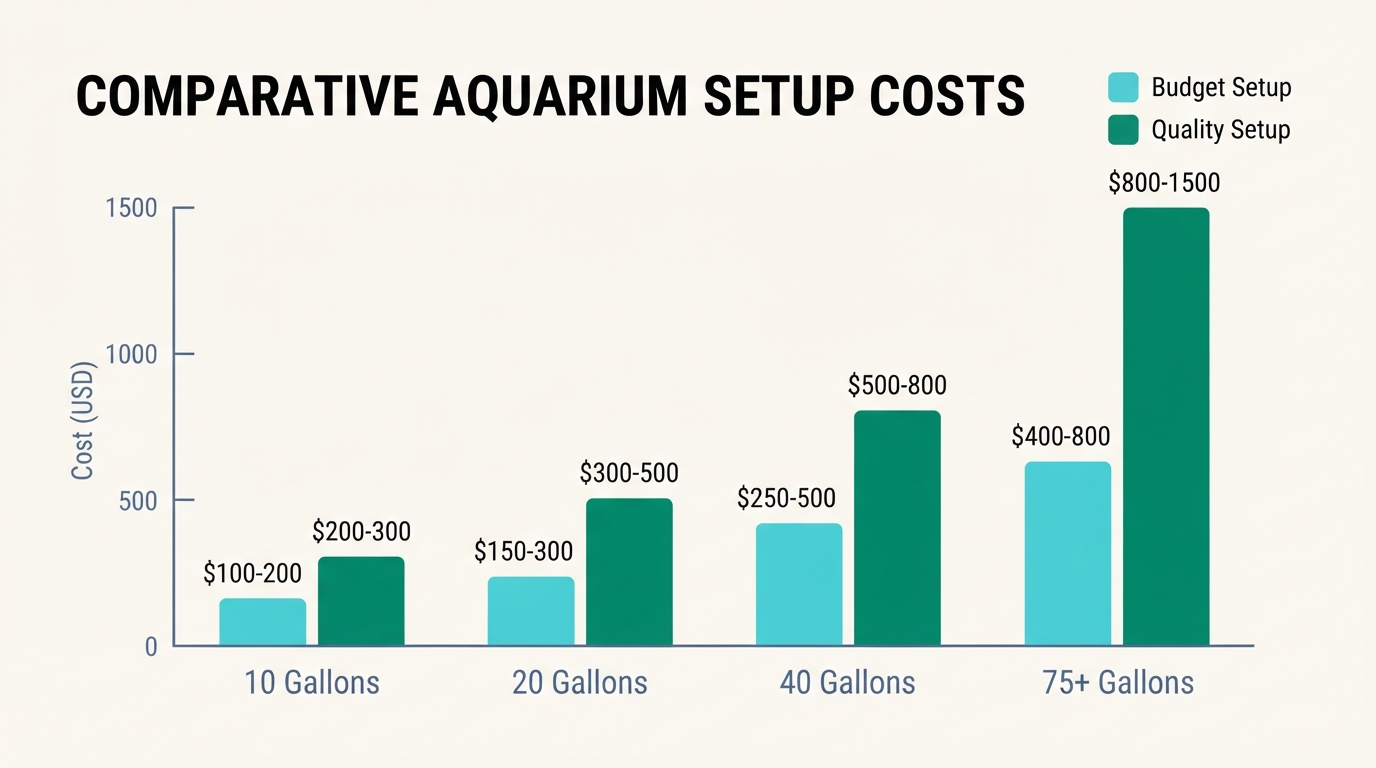 The cheapest way to set up an aquarium? A 10-gallon tank with budget equipment runs $100–$200. That's a complete, functional setup—tank, filter, heater, light, substrate, conditioner, and test kit. Start there if you're watching your wallet.
Beyond equipment, budget for ongoing costs:
- Livestock: Common community fish run $3–10 each. Specialty species can be $50+.
- Plants: $5–20 per plant if you go live.
- Food: $10–30 per month depending on what you feed and how much.
- Electricity: $5–20 per month depending on heater size and lighting. Less if you use LEDs.
- Maintenance supplies: $20–50 annually for medications, test kit refills, replacement media.
The gap between "budget" and "quality" setups usually comes from the filter (better performance, lasts longer), lighting (full-spectrum LEDs vs basic), and substrate (planted-specific substrates retain nutrients better). If you're new, the budget column is perfectly functional. If you expect to keep this tank for years, the quality column often costs less per month in the long run.
Timeline: How Long Does It Really Take?
What actually happens from decision to first fish:
- Research and shopping: 1–2 weeks. You're comparing equipment, reading reviews, maybe visiting the local fish store.
- Setup day: 1 day. The actual physical work of putting it together takes a few hours.
- Cycling period: 4–6 weeks. The part people don't want to wait for, but you have to.
- First fish: Week 5–7 after setup. After the cycle completes and parameters stabilize.
- Total time: 5–8 weeks from first decision to having fish in the water.
You can cut the cycling time to 2–3 weeks if you use seeded filter media from an established tank or high-quality bacterial starters like Fritz Turbostart or Tetra SafeStart. But even with these shortcuts, you're looking at weeks, not days. That's not a flaw. That's biology.
Sourcing Equipment and Livestock
Where you buy things matters. Different options have different tradeoffs.
Essential vs Optional Equipment
If you're building a fish tank equipment list from scratch, the distinction matters. You need some things. You don't need others.
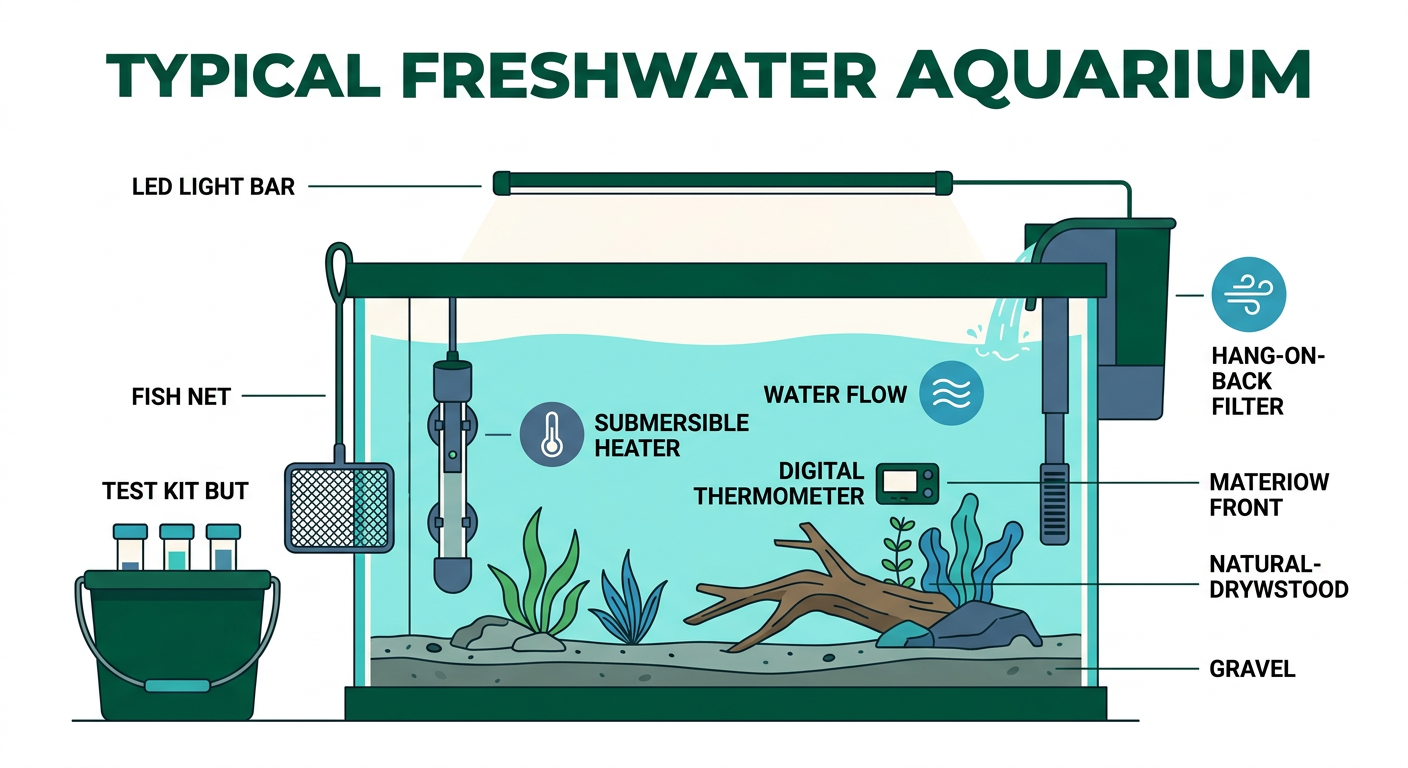
Essential equipment:
- Tank and stand: The container itself and something to put it on.
- Filter: Removes waste and houses the bacteria that keep the water safe. Pick one rated for your tank size or slightly larger. Types include hang-on-back (HOB), canister, sponge, or internal.
- Heater: If you're keeping tropical fish, you need this. Use 3–5 watts per gallon as a sizing guide. A 20-gallon tank needs a 60–100 watt heater.
- Thermometer: Monitors temperature. Verifies your heater is actually working.
- Lighting: Illuminates the tank and supports plant growth if you go live. LED is standard now. Better efficiency, adjustable spectrum for plants.
- Substrate: Gravel, sand, or specialized planted substrate. Rinse it before use regardless of type.
- Water conditioner: Removes chlorine and chloramine from tap water. Required for every single water change.
- Test kit: Measures ammonia, nitrite, nitrate, pH. Get a liquid kit like the API Freshwater Master Test Kit. Strips are less accurate.
- Net: For moving fish without stressing them. Soft mesh.
- Buckets: Dedicated aquarium-only buckets for water changes. Don't use them for anything else.
 Optional upgrades:
- Air pump and air stone: Adds bubbles and surface agitation. Nice for aesthetics but not essential if your filter already moves water well.
- CO2 system: For planted tanks only. Boosts plant growth but adds complexity. Skip this as a beginner.
- Automatic feeder: Dispenses food on a schedule. Test it thoroughly before relying on it. It's easy to overfeed.
- UV sterilizer: Controls algae and pathogens. Useful if you have persistent problems, but not a substitute for good maintenance.
- Canister filter: More powerful than HOB filters, holds more media, better for large tanks. Also more expensive and requires more maintenance.
- Wave maker or powerhead: Creates water flow patterns. Useful in large tanks or for certain fish species that want current.
- Quarantine tank: A small spare tank to isolate new fish or sick fish before putting them in the main tank. This one I recommend even if nothing else on the optional list appeals to you.
Local Fish Store vs Online: Pros and Cons
You'll buy equipment from multiple places. The decision usually depends on what you're buying.
Local fish store (LFS) advantages: You can talk to experienced staff. You see livestock health before you buy. They usually quarantine new arrivals. You support a local business. Fish arrive without shipping stress.
Local fish store disadvantages: Prices are higher. Selection is limited compared to online retailers.
Online advantages: Lower prices and frequent sales. Vastly larger selection, including rare species. Convenience. Customer reviews help you decide.
Online disadvantages: Shipping stresses livestock. Some arrive dead on arrival (DOA). You can't inspect before purchase. Shipping costs can erase the price savings. No local support if something goes wrong.
A pattern I've noticed: equipment is usually cheaper online, so buy filters, heaters, lights, and test kits from the internet. Substrate and decor you can buy locally to avoid heavy shipping costs. Fish themselves are healthier from a good LFS because you see them first and they've already been quarantined. If you do order fish online, expect a learning curve on how to acclimate them properly after shipping.
When to Buy What
Buy equipment first. All of it, before setup day. You don't want to realize you're missing something mid-process.
Buy substrate and decor the week before if you're getting them locally, or earlier if they're coming online.
Do not buy fish until your tank is cycled. The mistake that creates disasters. Wait. Your patience prevents dead fish later.
Tank Placement and Setup Day Logistics
Where you put your tank matters more than most people realize. So does how you execute setup day.
Choosing the Right Location
Weight first. A 20-gallon tank filled with water, substrate, and decorations weighs roughly 225 pounds concentrated in one spot. Your floor needs to handle that.
A 10-gallon weighs about 80 pounds. A 40-gallon weighs 330+. Do the math for your size and put it on solid flooring. Concrete is ideal. Older wood floorboards can flex and eventually fail under that kind of sustained weight. If you're unsure about your floor, ask someone who knows. It's not dramatic, but it's real.
Put your tank near a GFCI outlet within 6 feet. You'll need power for the filter, heater, and light.
Keep it away from direct sunlight. Sounds like a small detail but it drives algae blooms. You'll be frustrated by constant algae instead of enjoying the tank.
Low-traffic areas are better than doorways. Fish stress from constant movement in front of the tank. Calmer locations result in less stressed fish, which means healthier fish.
Keep the tank in a room with stable temperature. Avoid placing it next to HVAC vents or in spots where the temperature swings dramatically between day and night.
Where NOT to put your aquarium:
- Near windows (sunlight, temperature swings)
- In doorways or high-traffic corridors
- On uneven or old flooring without assessment
- Above electrical panels or water-sensitive equipment
- On furniture not designed for aquariums (like bookshelves)
Electrical Safety
Straightforward but non-negotiable:
- Use GFCI (ground-fault circuit interrupter) outlets. The outlets with the little buttons on them. They prevent shock if water touches an outlet.
- Create drip loops in your power cords. Bend the cord down before it reaches the outlet so water travels downward instead of toward the socket.
- Plug everything into a surge protector. Power spikes happen.
- Keep cords organized and off the floor. Don't create tripping hazards.
Setup Day Workflow
The aquarium setup, step by step:
- Place the stand where it's going and verify it's level.
- Place the tank on the stand.
- Rinse your substrate thoroughly until the water runs mostly clear. This removes dust.
- Add substrate to the tank.
- Install your filter, heater, thermometer, and lighting according to their instructions.
- Add decorations and plants if you're doing live plants.
- Fill the tank with dechlorinated water. Add water conditioner to remove chlorine.
- Turn on the filter and heater. Verify the heater is working and the temperature begins rising.
- Wait for temperature to stabilize, then start the cycling process.
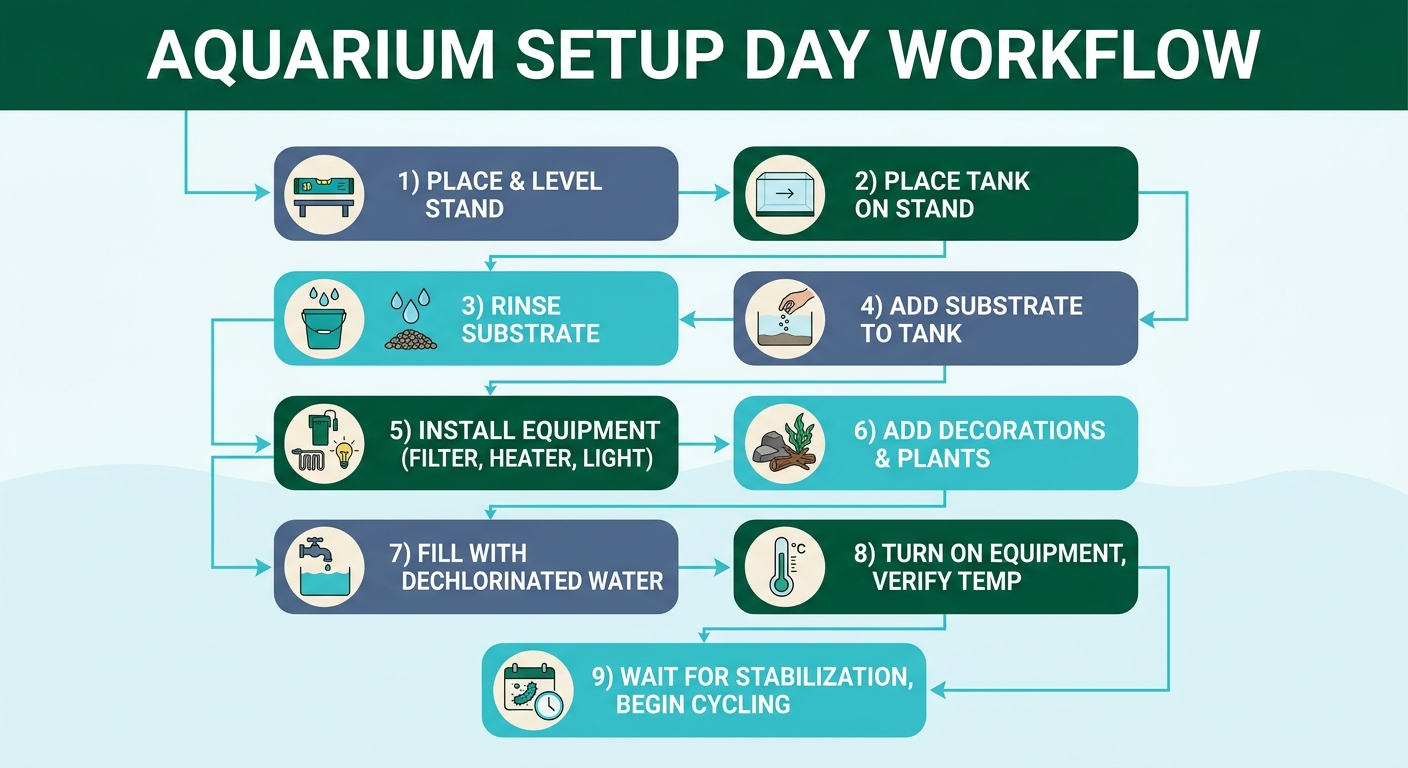 The physical process usually takes 2–3 hours. You can prep some things in advance. Rinse substrate the night before, for example. But most of this needs to happen on setup day itself.
The Nitrogen Cycle: What It Is and Why You Can't Skip It
This is where fish stay alive. The aquarium nitrogen cycle is what makes a tank safe. Understanding it is the difference between a thriving tank and fish that slowly poison themselves in their own waste.
Putting fish in a new tank right away is the single most common beginner mistake. Without a cycled tank, you're putting fish into water that will poison them within days. That's what cycling prevents.
The Nitrogen Cycle Explained
Fish produce ammonia as waste. Ammonia is toxic. If ammonia accumulates, fish get sick or die.
But there's a hidden solution already in the water: bacteria. Specific bacteria that evolved to eat ammonia and turn it into something less toxic.
The chain reaction:
- Ammonia (NH₃/NH₄): Fish waste, uneaten food, decaying plants. Highly toxic to fish.
- Nitrosomonas bacteria: Converts ammonia into nitrite.
- Nitrite (NO₂): Still toxic to fish, but less so than ammonia.
- Nitrobacter or Nitrospira bacteria: Converts nitrite into nitrate.
- Nitrate (NO₃): Much less toxic. Fish tolerate it at moderate levels (5–20 ppm is fine).
The nitrogen cycle. Not a theory, not something you can skip. It's what happens in every successful aquarium. The bacteria colonize your filter media, substrate, and any surface in the tank. They're invisible but they're working constantly, keeping ammonia and nitrite near zero.
A tank without this bacterial colony is a tank with rising ammonia. Fish exhibit stress behaviors, become susceptible to diseases, and eventually die. It doesn't happen immediately, which is why people think they can skip cycling. They can't.
Fishless Cycling vs Fish-In Cycling
You can cycle a tank two ways. Both work. One is humane, faster in practice, and easier on your fish (which you don't have yet). The other is stressful and requires constant monitoring.
Fishless cycling (recommended): Add an ammonia source, pure ammonium chloride, decaying fish food, or even a dead shrimp head. Feed the bacteria. Test every 2–3 days. When ammonia hits zero and nitrite hits zero and nitrate is accumulating, your cycle is complete. Takes 4–6 weeks typically. No fish are stressed. You get a robust bacterial colony before fish arrive.
Fish-in cycling (not recommended): Add hardy fish like zebra danios to produce ammonia naturally. The bacteria colonize while fish are already in the tank. You're constantly doing water changes to keep ammonia and nitrite low enough that the fish survive. Takes 6–8 weeks because you have to go slower to protect fish. Fish are stressed the entire time. They often get sick. Some die.
I've tested both. I have spreadsheets tracking the progression. Fishless cycling moves faster and produces more consistent data. It builds the same bacterial colony but without the animal stress. The parameters are cleaner, the fish-in cycle shows constant recovery cycles and spikes. When you finally add fish to a fishless-cycled tank, they arrive to a stable environment. That difference matters.
How Long Does Cycling Actually Take?
How long does the nitrogen cycle take? The typical answer: 4–6 weeks with basic setup.
You can accelerate it to 2–3 weeks if you use seeded filter media or substrate from an established tank. The bacteria are already present, so they colonize your tank faster. You can also use bottled bacterial starters like Fritz Turbostart 7, Tetra SafeStart, or ATM Colony. These products work best if they're fresh. Check the date on the bottle. Some are temperature-sensitive, so store them correctly.
Temperature speeds the process. Warmer water (78–82°F) encourages faster bacterial growth than cooler water (70–75°F). Surface area helps too. Sponge filters, ceramic rings, or extra media in your filter give bacteria more places to colonize.
But cycling is a biological process. You can't rush it beyond a point. Bacteria grow at a certain rate. Respect that rate. Impatience creates the classic disaster of adding fish too soon, watching ammonia spike, and losing everything.
How Do I Know When My Tank Is Cycled?
Test your water. The test kit is essential.
Your tank is cycled when:
- Ammonia reads 0 ppm (or very close to it)
- Nitrite reads 0 ppm
- Nitrate is accumulating (you'll see numbers like 5, 10, 15, 20 ppm depending on how old the cycle is)
Use a liquid test kit. They're more accurate than strips. Test every 2–3 days during cycling so you can track the progression. You'll see ammonia spike first, then fade as it converts to nitrite. Nitrite will spike next and eventually convert to nitrate. When you see ammonia zero, nitrite zero, and nitrate rising, you're there.
Once cycled, test once a week or every other week during the first month. After that, monthly testing is fine for a stable tank.
What If I Have Live Plants?
A question I get constantly. Plants absorb ammonia and nitrate directly. They're an extra sink for nitrogen. So yes, a planted tank can cycle faster or with lower peaks of ammonia and nitrite.
But plants don't eliminate the need for cycling. They reduce it, not replace it. A tank that's 50% plant and 50% hardscape still develops a nitrogen cycle. The bacteria are still colonizing. The bacteria are still necessary. You still need cycling.
Dense plant growth can let you skip the fishless phase and go straight to stocking with a small bioload. Maybe 5–10 hardy fish in a 40-gallon. That's a "silenced cycle". The plants handle so much of the load that ammonia and nitrite stay barely detectable. But this requires plants that are already established and thriving. If you're planting a new tank from bare substrate, give your plants time to root and grow before adding fish.
Testing Schedule During and After Cycling
During cycling: Test ammonia, nitrite, and nitrate every 2–3 days. You're tracking the progression.
For the first month after cycling completes: Test weekly. The cycle is new and slightly unstable.
After the first month: Test monthly, or whenever something looks off with the fish.
Pre-Setup Checklist: Are You Ready?
Before setup day, verify you have everything. Use this aquarium setup checklist before you touch a single piece of equipment:
Equipment and Supplies
- Tank and stand
- Filter and filter media
- Heater and thermometer
- Lighting
- Substrate (rinsed or ready to rinse)
- Water conditioner
- Liquid test kit (not strips)
- Net
- Bucket(s) for water changes
- Fish food for cycling (if doing fishless cycling)
- Bacterial starter (optional but helpful)
- Decorations and/or live plants
Location Preparation
- Floor assessed for weight capacity
- GFCI outlet verified working
- Space cleared and level
- Spirit level available to ensure tank is actually level
Water Preparation
- Test your tap water for chlorine/chloramine (water conditioner will remove it, but knowing your baseline is useful)
- Know your water's pH and hardness (this affects fish choice later, but good to know now)
- Have water conditioner ready
Time and Patience
- Schedule the 4–6 week cycling period. Mark it on your calendar.
- Commit to testing every 2–3 days during cycling.
- Accept that you won't add fish for 5–7 weeks. That's okay.
Emergency Plan
- Know the signs of ammonia or nitrite poisoning (fish gasping at the surface, unusual colors, lethargy). Document what to do if this happens.
- Have a backup water conditioner and extra test kits if cycling takes longer than expected.
- Set up a small quarantine tank if you plan to add multiple fish over time.
- Know a local experienced aquarist or have contact info for an aquatic veterinarian if something goes wrong.
What's Next?
Next up, Article 6 covers stocking your tank and adding your first fish. You'll learn how to select compatible fish, introduce them safely, and monitor them during those critical first weeks when everything is still stabilizing.
By then, your tank will be cycled and your parameters will be stable. The groundwork is done. What follows is the part where the tank actually comes alive.
Comments
No comments yet.